真正的Ruby | |位置/板
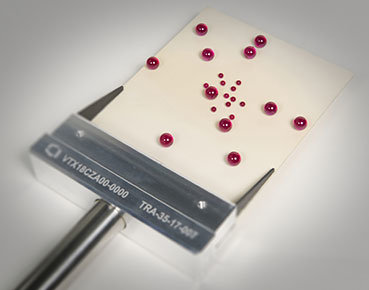
Exclusively available in Waygate Technologies' Phoenix V|tome|x premium performance CT system family, True|position and Easy|calib technology expand the measurement positions with specified accuracy to all positions which can be verified with the innovative patented Ruby|plate calibration phantom.
3D CT metrology starts here
Thanks to the patented Ruby|plate calibration phantom with its calibration uncertainty of less than 1 micrometer, even at a maximum probing length of 130 mm, not only a high measurement accuracy of up to SD ≤ (3.8 + L/100 mm) µm for both positions referring to VDI 2630-1.3 guideline can be specified, but also remarkable SD ≤ (5.5+ L/50 mm) µm for all other positions besides the VDI positions can be reached within the V|tome|x M premium CT scanner. Additionally, by applying the fully automated Easy|calib, the VDI specification SD ≤ (3.8 + L/100 mm) µm can be met at any position with just a few minutes of calibrating.
Due to highly automated routines, the new Ruby|plate calibration phantom and True|positions' compensation of remaining mechanical positioning uncertainties as well as correction of thermal effects by using temperature sensors, these proprietary innovations bring CT metrology workflows and precision to a new performance level.
To measure large, complex objects, Waygate Technologies also offers the Ruby|plate 240 calibration phantom for its Phoenix V|tome|x C450, enabling users to perform VDI 2630 compliant precision metrology with specification of SD ≤ (15 ± L/50 mm) µm
Phoenix V|tome|x M microCT scanner:
SD ≤ (3.8 ± L/100 mm) µm referring to VDI 2630 guideline
SD ≤ (5.5 ± L/50 mm) µm or all other positions besides the VDI positions
SD ≤ (3.8 ± L/100 mm) µm at any position when applying the fully automated Easy|calib tool
Phoenix V|tome|x C minifocus CT scanner:
SD ≤ (15 ± L/50 mm) µm at both VDI 2630 positions and, after applying Easy|calib, at any position
Phoenix V|tome|xL300&L450 large walk-in cabinet scanner:
SD ≤ (6.8 ± L/100 mm) µm with microfocus X-ray tube at both VDI 2630 positions and, after applying Easy|calib, at any position
3x faster VDI 2630 1.3 specifications conform performance verification: Thanks to the greatly simplified verification with the new, patented Ruby|plate phantoms, the process can be reduced from 18 to 6 required scans compared to conventional Ball|bar phantom
Faster and easier CT setup for precision metrology tasks performed with specified accuracy at multiple positions
Technical Specifications
Technical Specifications
FAQs
The patented Ruby|plate allows a 3x faster automated verification of the specified measurement accuracy (SD) according to VDI 2630 1.3 (compared to current technology): All directions and length required by the guideline are covered by its ruby spheres alignment on ceramic plate in just one scan.
Waygate Technologies´ innovative metrology features such as True|position or Easy|calib allow users to quickly and easily determine the systems´ geometry at any point, ensuring the ability to automatically correct any deviations and maintain conformance with the VDI 2630 standard. For our premium metrology CT scanner Phoenix V|tome|x M, applying those features means to reach SD ≤ (3.8 ± L/100 mm) μm not only at both VDI positions, but at any position. For our customers combination of maximum flexibility, reliability and precision is a big benefit.
By scanning the Ruby|plate phantom and applying our fully automated validation processes, our customers themselves are able to specify their systems´ measurement uncertainties in less than 10 minutes.
Not as much as you might expect: Even our granite-based and air conditioned large walk-in cabinet Phoenix V|tome|x L300 and V|tome|x L450 CT systems reach with their microfocus X-ray tubes a remarkable precision of SD ≤ (6.8 ± L/100 mm) µm at both VDI 2630 positions and, after applying Easy|calib, at any position.
Yes, our Ruby|plate 240 calibration phantom is the largest of its kind on the market, enabling users of our 450 kV minifocus Phoenix V|tome|x C450 CT scanner to scan e.g. light metal castings with a precision specification of SD ≤ (15 ± L/50 mm) µm at both VDI 2630 positions and, after applying Easy|calib, at any position.
Yes, when ordering your system, you do not need to order the Metrology|edition configuration yet. All actual and most Phoenix V|tome|x M, C and L systems built in the past years can later be upgraded for higher metrology performance.


